Creating Workflows
Workflows allow you to add multiple tiers, rules and triggers that automatically route content for review.
To create a workflow, navigate to the Contacts tab, then click Add Workflow in the top right.
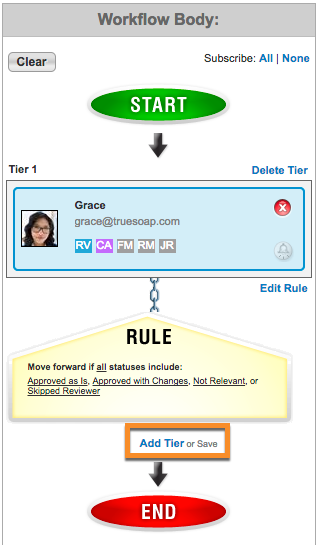
This takes you to the Workflow Editor page. To begin, you will create a tier of reviewers with a specific set of rules. Drag and drop, or double click the reviewer(s) you'd like the proof to be routed to in Tier 1, then click Add Rule.
Tier Rule Settings
1 - Approval Settings:
In this section, you'll want to indicate which statuses will move the proof forward to the next tier of reviewers. If you'd like the proof to move forward no matter what status is selected, click all checkboxes next to each status under the section, 'Status is set to.'
In the example below, the proof would only move forward if the proof statuses included 'Approved as is,' 'Approved with changes,' or if a reviewer was skipped. The statuses 'Change and Resubmit' and 'Contact Me' would stop the workflow and send the proof back to the designer.
2 - Reviewer Requirements:
By default, all reviewers in the tier are required. However, if you don't need all reviewer's feedback in the tier, you can make certain reviewers optional.
3 - Minimum Reviewers & Time Constraints:
If you mark all reviewers as optional, you can also add the number of reviewers needed in the 'Minimum # of Reviewers' field. Once this number is met, the proof will proceed to the next tier. In addition, setting a time constraint will move the proof forward after the allotted time.
When you're finished with the rule, click Save.
To create additional tiers, click 'Add Tier' below the rule for Tier 1. A box will appear where you can drag and drop to add the next group of reviewers. Repeat the same steps from the first Tier, changing any settings according to your preference. Click Save once you are finished editing the workflow.

Workflow Best Practices
Here are some examples where the use of Workflow Tiers can be beneficial.
1. You have multiple groups of reviewers that need to review a proof. However, there is a hierarchy to the review order and you would like the ability for any reviewer that does not approve the proof to stop progressing to the next group of reviewers and return to you so you can make the changes identified. Then, you can release a new version back out to the Workflow team with the corrections.
2. You have multiple groups of reviewers for a proof. You want a certain group to have no more than 48 hours to have access to the review before progressing to the next group of reviewers or sending back to you with any captured reviews. Using Workflows, you can define a time constraint and once expired the project move to the next step in your flow.
3. Your proof needs to be reviewed by the legal department before it can be returned. It does not matter who in the Legal Department performs a review - you just need one person to sign off. Using Workflows, you could invite multiple people from the Legal department, set them all as optional reviewers and set a minimum threshold of at least one reviewer before moving to the next tier in the workflow.